Tuesday 20 December 2011

'vapour lock'


I did promise in my last post to tell you about a vapour lock. A vapour lock
"is an old car mechanical term from way back when. It's when the gas line in your car would overheat and turn the gas into vapor which would automatically stall your car, dead in it's tracks because of lack of fuel. They did something in auto technology to correct this problem as I have not experienced it in over 20 years"
(thanks to John Hodur in the States who enlightened me on that)
And the connection to boxes? It happens to me all the time - I get stuck on a little problem and until it's solved I can't go forward. I can't go around it. I have to solve it and go through it. 
The last time it happened was with the magnets for some treasure boxes.The 3mm magnets were about 2.9mm and were a bit sloppy in the holes and the 4mm were fine but a bit too big and I'd have to send back the 3mm that I'd bought...

Friday 9 December 2011

I'm slacking


The funny anomaly about writing a blog is that the greater the time gap between entries, the less there is to say.
I think I've been doing work that I've spoken about before, and I've had a birthday, and... I've run out of excuses.Well - the only way is forward...
A little batch of 'treasure' boxes was finished yesterday - next time I'll tell you about a vapour lock...

Thursday 1 December 2011

HMS Victory Box


I'm making more trays! This time for a box made from oak taken from Nelson's flagship HMS Victory

Wednesday 30 November 2011

photo tipette


I am a box maker. I am not a photographer. Nevertheless in the spirit of blog writing which I think in my case means writing what I do all day I thought I'd include a photo of how I take my photos!
A roll of photographic paper hanging from the ceiling, one small flash unit with a soft box, an infer-red trigger on the camera and a reflective board. ( sorry, that's not in the photo - I'd taken it away). Camera set to manual with the flash off and that's it - job done!
It did take me years to get to this point though...

Tuesday 29 November 2011

sharpening - today's tipette

After I've hammered in the pegs on the sides of the boxes they are faceted - I think there was a photo of this a lttle while ago.
A sharp chisel for this is essential so I thought I'd show you how I sharpen.
Two stones, one medium and one very fine - almost slate like, an eclipse jig and a couple of pieces of MDF glued up to make a measuring jig.
One side of the jig is for plane irons and the othe for chisels.

Saturday 26 November 2011

complete

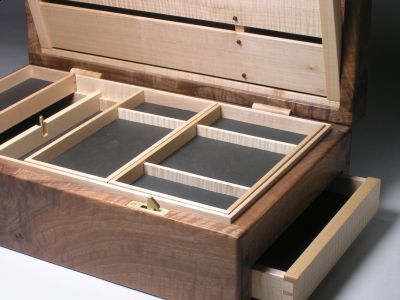
Just to finish off - here's a couple of pics of the jewellery box finally complete!

Friday 25 November 2011

Velvet

High time I finished this box!
I attach the velvet to card before lining the jewellery box. Copydex is great for this but it does have an almost magical ability to jump from the container to the face of the velvet. Once it's on the pile of the velvet there's no way it will come off. Take it off and start again. You would think I'd have learnt after all these years.


Monday 21 November 2011

Back up to date.


I thought I would publish a pic of the jewellery box before the tray was assembled because a week or so ago I was giving daily updates on this box.
Hopefully it will get finished today - finally...

Saturday 19 November 2011

final post of stationery box

As promised - quite a long time ago I know - some pictures of that big stationery box. There are more pics and a description on my website.

Friday 18 November 2011

hello again!


When you haven't written for a while there's too much or too little to say. Where to start? Computers! Boxes! I had a major computer meltdown problem. I was a tenth of a millimetre away from buying a new one. But Thomas put in a heroic effort and brought it back to life. At one point I wondered if there could be a loose connection inside the wretched thing so I took the back off - but I didn't get to fix anything...
I'll try to catch up.

Saturday 5 November 2011

computers!

I cannot believe that I have spent (or to be more precise) - my son son has spent, ( I mostly just watched) nearly an entire day trying to fix an 'error' on the computer!
Progress on jewellery boxes was nil.
I did manage to put some velvet into some ring boxes while I was watching...
And I was going to post a photo - of my computer - but I couldn't because of .....an error.

Thursday 3 November 2011

curved lid


The lid is now cut to shape -curved both on the underside and the top - and rough sanded. I carve the lid first with an 'arbortech' in an angle grinder then sand it with a rotary sander using a 40grit disc and then with an eccentric rotary sander working my way down to 400 grit.

Wednesday 2 November 2011

glued up


The jewellery box is now glued up and ready for its lid. All of the inside surfaces have been sanded to 400grit including both sides of the front and back.

Tuesday 1 November 2011

pivot hinge jewellery box

At long last I've started work on a new jewellery box. This one is in elm which is both spalted and burry.  I need some of these made and up on the website for Christmas.So it's all stops out, and head down. Unless it's flyable of course...
I haven't forgotten finished pics of the stationery box - just haven't taken them yet.

Sunday 30 October 2011

Guilt trip


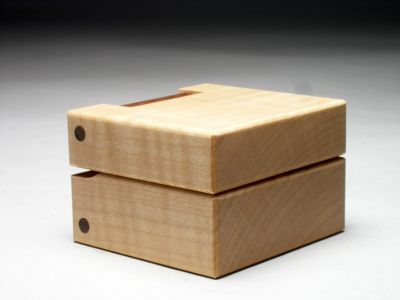
I took the day off! I feel so guilty . But the winds were light and the day was sunny so I just had to go flying- paragliding that is. Not a box in sight! Well, that isn't completely true, I did get up very early and fit the rare earth magnets to a batch of ring boxes.I'll work the weekend....

Friday 28 October 2011

sanding edges


One small batch of sycamore ring boxes shouldn't take too long but I hit a snag.
I think at the root of the problem was the rather light weight fast grown sycamore I was using. Normally sycamore is pretty dense and cuts beautifully but this particular tree was an exception. I've never seen growth rings in sycamore so far apart.
I made the ring boxes as usual and got a good finish with sandpaper but when I came to cut the quarter rounds on the edges I was left with a ragged edge.I was using a block on a small spindle moulder with a high speed knife which was as sharp as it could be. ( the peripheral speed of the cutter blade is a lot faster than using a router.) I tried sanding them by hand but what I really needed was some sort of machine to neatly, evenly and cleanly  sand the round overs. I just couldn't think of a way of doing it. So I spent almost an entire day building a jig. It was partly successful but if anyone out there in blog land can think of a better solution I shall be forever in your debt.

Tuesday 25 October 2011

Finished -ish


I'm very pleased to say that the stationery box that I've been working on for these last few weeks is finally off the bench. It's not yet oiled but it's made! So I celebrated yesterday by tidying the workshop, giving it a thorough vacuuming and I even cleaned the windows - well I couldn't see out of them...
The phot shows the wooded latch which holds the lid rack in place.

Monday 24 October 2011

lid rack

The rack which pivots forward and sits inside the lid is now glued up and ready to go  - dispite my managing to get the left and right muddled up and glueing the division onto the wrong side!

Ten minutes on the batch of ring boxes while the glue was drying.
My mind is running ahead - I'm wondering what to make next 'long boxes'? finish the ring boxes? or some medium sized jewellery boxes? Not sure yet.

Saturday 22 October 2011

circular saw sledge


The box continues to progress - much more than that I cannot say as I'm now working on the secret compartments... The pile of ring boxes stands forlorn.
So instead I thought I'd pop in a picture of my saw sledge (or is it a sled?) A piece of wood for a stop and if you want to adjust the cut by a tenth of a millimetre - use a piece of paper. Two tenths of a millimetre - two pieces of paper...

Friday 21 October 2011

brass plates

I made two new striking plates - I don't like metalwork - metal dust is so much dirtier than wood dust! and last night I was burning midnight oil making the final adjustments. And it works. The finishing straight is definitely in sight for this box!

Thursday 20 October 2011

sanding jig


The moment of truth arrived when I fitted the mechanism for the last time, complete with a drop of oil and lowered the lid. It didn't work! How could it not? This was not fair. I'd measured everything. Everything was right to within a tenth of a millimetre or so and one of the catches was missing the striking plate by about 2mm! There was no way that could happen and yet there it was staring me in the face. Laughing at me! I didn't understand it last night before I went to bed and I don't understand it now. So I'm making some more plates and adjusting things.
Nothing of which has anything to do with this photo. I started work on some ring boxes while I was waiting for some glue to dry and for today's tipette I thought I'd show you my jig for making the ring box hinges absolutely square and absolutely the same size on my disc sander.

Wednesday 19 October 2011

todays tipette

A"tipette" is a little tip...
Fix a piece of MDF or plywood onto your drill table - it make it so much easier to clamp things in place to drill them and to clamp on stops so as you can drill a repeat hole.
I am still working on the stationery box! I just can't say too much about it. I'm working on the 'keys' at the moment.

Tuesday 18 October 2011

The Dales Highway


I'm back! We've just walked part of the Dales Highway which is a 90 mile trail through and over the tops of the Yorkshire Dales. It was very soggy. It does take your mind away from boxes for a while though which is a good thing. Now though I'm back in harness and I'm on the final leg of that big stationery box that's a secret so I can't tell you about it...

Friday 7 October 2011

leather

I tend to use leather to line boxes for men and velvet for jewellery boxes. One thing I've  learnt about fitting leather into a given space is to cut it around 0.5mm larger than the space. Leather can contract as well as expand - a bit like skin...

Thursday 6 October 2011

Setting out table

The stationary box continues to progress. I needed a large, clear space in the workshop to unroll and cut out leather and velvet for the inside of my boxes and of course space is always at a premium so I hung my setting out table from the ceiling and now every time I need to unroll the velvet for the insides of a jewellery box or the leather which I generally use for my desk boxes, I lower the table from the ceiling.


Wednesday 5 October 2011

glue theory

My theory about glue is that it should prevent things from coming apart - not hold them together. There are those craftsmen who maintain that with modern adhesives joints are not so important any more. I disagree strongly. How can we know what will happen to that glue in fifty years? Whatever I'm making should hold together without any glue - then it's well made. The glue is simply to stop it coming apart.
I'm not sure I'm going to win the Nobel prize for that theory... it seems odd that we don't know what three quarters of the universe is made from...

Tuesday 4 October 2011

Never use a rule

I seldom use a rule for marking out. I always try to mark the length of something straight from where I want it to fit.
In this case I'm marking the width of the box onto a tray piece. I'll then set a stop on the saw and cut a test piece before cutting the real thing. At this point I'm looking for a tight fit - the dovetails are then cut about half a millimetre over size and the tray then fits into the box perfectly.

Monday 3 October 2011

Dovetailed trays today

Monday has come round again. And I had the weekend off! Saturday was spent at a wedding trussed up in a tie and trousers that were to tight around my big belly. I enjoyed the wedding but not being trussed up. Sunday I worked on the sideboard - a substantial piece of furniture that's going to hold the breakfast buffet for Chris' bed and breakfast guests. I'll publish a pic when it's finished. So not a box in sight for the entire weekend - which is good.

Saturday 1 October 2011

Think outside the box?

Definitely a case of thinking outside the box! These grooves really should have been put in before the box was assembled but I have to admit I do find it difficult sometimes anticipating how everything is going to work before I actually see it. And I sometimes certainly spend too long thinking. So it's a compromise

Friday 30 September 2011

Brass catch

                       
These photos show a little brass plate which is designed to hold the drawer shut.
The drawer won't have a handle . It will spring out when it's released from inside the box. And the box of course is locked with a secret mechanism.

Thursday 29 September 2011

Lots of Pieces

A much better day! The drawer runners are now all made, the sycamore lining is nearly finished and I've now got a fairly clear idea of where I'm going - which is the important bit...
The photo is of the best way to cut the thin fillets which go either side of the drawer.
I think what's been making things so slow is that everything must slot together without glue because all of the insides need to be accessible to adjust in years to come.

Wednesday 28 September 2011

A days work

I can't believe how little I achieved yesterday.All I managed to do was fit the drawer - or refit it because I already fitted it once before the box was glued up and I made the drawer front for the other end of the box
I did make part of the front and back lining and I did a lot of thinking.... Maybe I'll have a surge today.

Tuesday 27 September 2011

Glued up

Finally the box is glued up!

I'm now faced with the decision of whether to finish the outside of the box or to make all the inside pieces first. Insides I think because once the lid is hinged it might be more difficult to work inside the box.

Monday 26 September 2011

New week

It's a new week! which means a new begining, new resolutions and things. I don't think I did too well last week - almost an entire week and only one small relatively simple drawer to show for it! This week I will do better.


I'm pleased to say that I didn't darken the workshop door yesterday (Sunday) well, I did, but only to mend the lawn mower - I'm not sure by the way that you can get away with shortening the starting cord - but I didn't touch a box or anything box related. So I shall bounce into my workshop this morning fresh and raring to do some serious progress on this stationery box. Actually Chris is away today so it's a good day to really concentrate and hopefully get the carcase glued up.

Saturday 24 September 2011

drawers

I can hardly believe that I spent almost all day making just one drawer! But it's true that's pretty much all I had to show for the days work. I did make a rough box from red wood (softwood - something I scarcely ever use) which was a prototype but I'll tell you more of these boxes once I get under way with them.


Back to the drawer. I did cut four pieces of ripple sycamore before I found a piece I liked and it is of course dovetailed on all four corners and I guess I did get through the days paperwork but still, one drawer....

Friday 23 September 2011

Museum acquisition

Can I blow my own trumpet a little? I guess I can blow it here - that's what blogs are all about aren't they?
I've been commissioned to make a box for Tullie house Museum and Art Gallery in Carlisle! They want a box for theit permanent collection! I'm quite flattered.
the box they want will be a jewellery box a little bit like this one:


Fortunately They don't want it before Christmas!

Thursday 22 September 2011

Stationery progress

And yes, that title is meant to be ironic... well at least it feels like that sometimes. Just very slow progress. Here's a first pic of the stationery box
It's european burr walnut. A fantastic piece of wood. I can only show the back hinges - wooden of course - here as at the moment if I showed the front of the box you might get a clue to the opening mechanism. Peter

Wednesday 21 September 2011

I'm Back!

I know, I bet you thought - here's another blog started off all keen and like so many blogs and diarys it's fizzeled out.
Well it hasn't! I've been away paragliding in Spain. Flying with vultures. Fantastic!
But what of boxes I hear you ask, I didn't log on to read of flying around Spanish mountains., what's the next jewellery box?
Well the answer is it isn't exactly a jewellery box, it's a stationery box but the trouble is that it's got a secret locking mechanism so I shall have to be a little careful with what photos I publish - otherwise it won't be a secret!
Not a piece of jewellery in sight but I'll get back to boxes soon.

Friday 2 September 2011

Velvet inserts

Ring boxes once again took up most of the day.Making the little foam and velvet pieces is very fiddly work and as usual several hit the bin because the glue - only a microscopic dot- got onto the surface of the velvet.


The writing slope is now waxed and the very final job is to glue the lid pivots in place. So I have made it - the customer is coming this afternoon!